In this section, we will be examining the small homeowner's blowtorches. I have but few pictures right now, but more will be added eventually. Because I have seen only about three manufacturers of these, this section will be written in an all inclusive style rather than the sectioned style used in the 'pints and quarts' section. Troubleshooting hints, repair, lighting procedures and repair techniques will be discussed together.
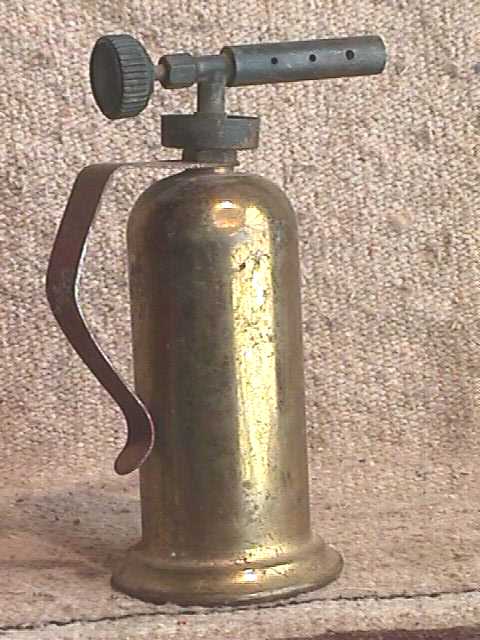

I will be restricting the discussion to the Lenk gasoline and alcohol blow torches that can readily be found on Ebay. The samples above are a for agasoline torch at the left and an alcohol torch on the right. Note the difference in the number of holes in the burner head. Other than the size, one apparent difference between the full sized and miniature torches is that the miniature does not have a pump, yet it operates very similarly to the full sized torches. The pump is not needed because of the torch's size, the heat produced during operation is enough to cause the fuel to expand, create enough pressure in the tank to cause the fuel to flow and thus sustain the flame.
The miniatures do have a little drip tray that must be manually filled with fuel. The fuel valve must be fully closed when the drip tray is lit on fire. The heat produced warms up the burner to the point where a flame can be sustained. The miniatures are very sensitive to leaks. If there is a leak in the tank, packing nut, fuel valve or fuel fill plug of any noticable magnitude, this leak will likely prevent the torch from working. There is simply not enough reserve pressure in these little guys to sustain a flame and keep up with a leak, too.
Just like their big brothers, the little torches are plagued with the same common problem: They get plugged. The single most common problem, especially in the alcohol torches, results when someone has burned booze in the torch. The alcohol burns away but invariably there is a syrup substance that is left behind that really raises hell with the torch's innards. The wick is the first to go. The best solution is to replace it with a new one. You can make a wick by pulling the strings out of a cotton mop head from the hardware store. It MUST be cotton! When replacing the wick, be sure to reattach the wire from the old wick onto the new wick. The wire should be about as long as the tank when it is fully stuck into the burner assembly. If this wire is the proper length, it will just touch the bottom of the tank when the torch is fully assembled. Do not neglect to replace this wire. It has to be there to conduct the heat from the burner head to the raw fuel so the fuel will heat up. If the wire is deteriorated or gone completely, you can use number 14 solid copper or brass wire as an acceptable substitute.
The orifice usually plugs, too. This writer has seen orifices that were so badly plugged, that they had to be redrilled. The second most common problem is the fuel plug in the bottom of the tank gets leaky. They usually have an O-ring on them that gets rotten and has to be replaced The little fuel passageway commonly gets plugged up from burning booze instead of proper alcohol. The gasoline miniatures get plugged due to carbon buildup.
The miniatures also have problems with the packing nut whereby, the fuel leaks out from around the valve stem which produces a drop in tank pressure. Probably half of the miniatures seen by this author have a broken needle on the end of the valve stem. The theory is that this happens when the torch is shut down. If the torch operator closes the fuel valve too tightly, this little needle will get stuck in the orifice when the torch cools. Upon reopening of the fuel valve, the little needle snaps off. It can be very frustrating getting this broken needle out of the orifice!
What do you do if you have a miniature that seems to be complete, clean, no leaks anywhere, yet it refuses to work well, if at all? The very first thing to check is fuel type you are burning! You cannot burn alcohol in a gasoline torch and vice versa. Oh, it will work but it will not work properly. The flame will either be very wimpy or it will readily blow itself out. There are two distinguishing characteristics that determine which fuel to use. First, look at the burner head and count the number of holes along one edge of it. If you count three holes, you have an alcohol torch. If there are only two, you have a gasoline torch. If you have an alcohol torch, do not use rubbing alcohol! There is so much water in it that it will not burn properly.
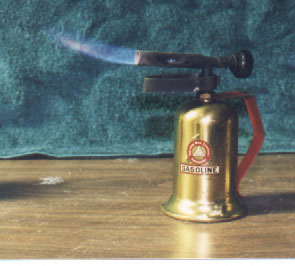
We're not done yet! Check the orifice. The alcohol one is bigger than the gasoline orifice. This is due to the difference in combustibility of the one fuel over the other. Make sure your observation agrees with what the decal on the torch tank says. If there is a discrepancy, someone has been doing the old switcharoo on blow torch parts! Make sure the correct burner is with the correct orifice which is with the correct tank. They are mechanically interchangeable but operationally, they are not. There is nothing peculiar between an alcohol tank and a gasoline tank; A tank is a tank.
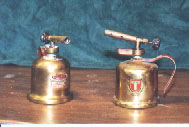
Shown here are two fairly common miniature torches. The one on the left is made by while the one on the right was made by turner. These are both gas burners and were built for small jobs. These sometimes are referred to as homeowners' torches. These are fairly common on Ebay with the turner torch commanding the highest price for a given condition. They are both built in a similar way to the very common Lenk gasoline torches, so if you are good at making a Lenk torch work, you will have no trouble bringing one of these little guys to life!
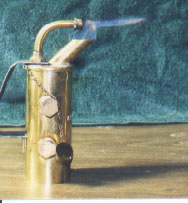
One of the more interesting miniature blow torches is the two chamber alcohol. These came in two flavors, one with a baffle/mix chamber and one without. In the case of the type without a mix chamber, the auxiliary wick must be burning at all times for the torch to work. The self generation can only occur in a torch with the mix chamber/baffle and therefore, once the torch is up to operating temperature, the wick can be blown out. These are very beautiful little torches and they are lit very easily and come up to operating temperature very quickly.
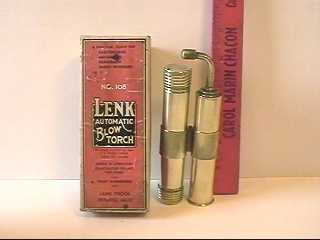
Lenk manufactured a small, unique torch that had two tanks, about .75 inch in diameter and about five inches long. The miniature of miniatures. On one tank there is the orifice head with a small wick. On the other, there was a rather large wick at the top of it. This wick is huge compared to the wick in a quart tank! It has a much different purpose in the miniature than it has in the quart blow torch. In this miniature, there is no baffle, so there is no way to self sustain the flame. The wick is positioned such that it is directly under the orifice head and it is then lit on fire. The heat produced by the burning wick heats up the orifice head and also conducts down to the tank, heating it up as well. This heating effect causes the fuel to expand which causes a buildup of pressure, thus causing evaporated fuel to escape from the orifice head. The escaping fuel has considerable velocity. Obviously, this escaping fuel will catch on fire in the presence of the burning wick. You must realize that the wick must remain burning for the torch to burn.
The wick is creating the pressure that causes the fuel to escape as well as the heat to keep the torch burning. The problems with this style miniature are few. Either the orifice gets plugged up or the wick INSIDE the orifice tube deteriorates and rots. A pipe cleaner is an ideal wick for this torch. When removing the old wick, it is common for the old wick to break off inside the orifice head! Fortunately, the orifice head screws off of the orifice tube, thus simplifying the removal of the obstruction.